↓
 
  • Home
  • About Me
  • Privacy Policy

Knoontime Knitting

One Writer's Journey Into 3D | Bestselling Author A Catherine Noon

Knoontime Knitting header

Tag Archives: Journey Into 3-D

Work In Progress Wednesday

Knoontime Knitting
Attempt the First

It’s Wednesday.  I figured I’d share what I’ve been crafting around with.

My first item to share is the Emerald Keep Scarf, which will be a giveaway in the forthcoming Keepsake Tour starting March 8th, to celebrate the release of Book 2 in the Persis Chronicles, Emerald Keep.

It didn’t work.

I mean, yeah, it’s fabric, and it’s knitted.  But that’s about it. For one thing, the stitch said WS (wrong side) for both pieces, but either I misread it or it’s a typo because clearly, it’s incorrect – the edge stitches clearly are backward from the main lace stitches.

Attempt the First, Backside

This is a view where you can see the edge stitches are right-side up, while the lace is wrong side.

Grr.

Attempt the Second, Front and Frustration Both Start with F.
So does my favorite swear word.
Jus’ sayin’.

Started over.

And… I don’t like my idea of the border.  You can’t really see it well in this shot, but the edges pull in too much and make it look sloppy.  The reason I wanted a border to begin with is that this stitch has quite a bit of bias curl; however, the edging I picked (mistake-stitch rib) isn’t working.

I think either I’ll throw an extra yarn over in to create a sort of gutter, or eliminate the edges entirely.

Mancooking.
Why move stuff outta the way when you can stand over it?

I mentioned to a friend that we made candles last weekend and realized I neglected to take photos.  I planned to take pics of the cold pots, but we have to cook in our kitchen so they had to come off the stove.

And, apparently, my kid thinks it’s no big deal to stand over them rather than move them out of the way.  He’s cooking a very lovely taco salad at the moment, (well, cooking the sausage that will go in the taco salad).  Yum.
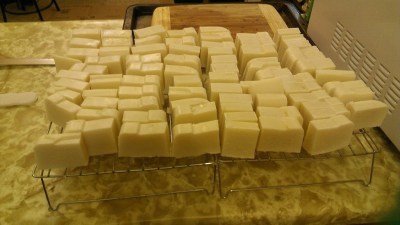
Soap! Curing!

Our batch of soap that we made a couple weeks ago is curing very well.  It’s a lovely creamy ivory color now.  We cut it this weekend to allow each of the bars exposure to air, so they can continue the curing process.

In case you’re wondering, curing is letting the chemical reaction between the fat and lye to finish.

This is raw soap and not milled soap, so it’s not made in a mold.  You can use it as is, once it’s cured, or mill it again and then pour it into pretty molds for a nice appearance.

Candles, Dipped 2015

I only made a half-dozen this year so far; I may fire up the pots once more before I put everything away.  I like the way these came out; they are nice and uniform.  They’re also really long, which is my favorite (I have four different heights I can make).

Basket-o-Candles, Bad Lighting.

This isn’t a very good shot, but it’s of my candle stock.  I’ll see if I can get a better one for you one of these days – but for now, it’s off to eat dinnah.

Yum.

What are you making?

Posted in Knoontime Knitting - One Writer's Journey Into 3-D | Tagged A. Catherine Noon, acatherinenoon, Candlemaking, Candles, cooking, Design, Journey Into 3-D, Knitting Projects, Knoontime Knitting, Soap, Soapmaking, The Design Notebook, Work-In-Progress Wednesday

A Journey Into 3-D Notebook – Hats!

Knoontime Knitting

So I’ve been playing with knitting from the top down.  I started a sweater and have been wrestling with it (which I’ll share later), but for now I want to share my newest creation:  a hat!

My first hat was almost a decade ago.  A friend asked me to make a hat for her friend.  I did so.  It was large enough to fit her, her friend, AND me – and not just our heads.  It was not, shall we say, a success.

Since then, I’ve successfully mastered all kinds of things in knitting:  sweaters, sleeves, socks, lace, design…  So why not hats?

I asked myself that and then gave it a shot.

This one is fun because the increases are one-off from each other so that they swirl around the head.  I did the crown with a merino wool, then the sides with an alpaca and mohair blend that’s fuzzy and whisper-soft.

I even like how it looks on me.

And you can see it from the back.

I want to try making another hat that’s a little smaller, so it stays tighter on the head. In fact, I started one, but that’s a post for another day! 🙂

Posted in Knoontime Knitting - One Writer's Journey Into 3-D | Tagged A. Catherine Noon, acatherinenoon, Design, Journey Into 3-D, Knitting Projects, The Design Notebook

A Journey Into 3D Notebook – What I’m Working On

Knoontime Knitting

November is coming, and with it, NaNoWriMo, or National Novel Writing Month.  During the month of November, NaNo-ers write 50,000 words on a draft of a novel – some more, some less, and the madness that ensues is infectious.

I wish we had a NaKnitMo, National Knitting Month.  Wouldn’t that be awesome?

I was lamenting recently to Rachel Wilder, my partner in writing crime, that my stash is reaching epic proportions.  I typed up what’s under the bed in bins and showed her pictures of my shelves in my office, which overflowed from the huge apparatus over there to the top of the filing cabinet over here.

Unperturbed, she said, “Just think of it as hours of pre-paid entertainment.”

Blink.

LOFF!

In celebration of that, I figured I’d share a few of the things I’m working on or have recently finished.

This is an Ojo de Dios, or “Eye of God.”  Made by the Huichol peoples of South America, they are prayers of blessing and good fortune.  Ojos are made and placed in the central village temple for blessings on a child, a new business venture, a marriage, and many other occasions.

This one was fun to make since I usually make much smaller ones.  This one is about 12 inches on 1/2 inch dowel rods.  I sanded the dowels and then stained them using a combination of varnish and stain.  I skipped the recommended steel wool sanding in between the two coats and I think, in hindsight, I wish I had done it; on the next project I will use that as part of the preparation.  Overall, though, I like how the dowels came out.

I used a large, bulky yarn with an overdye pattern, which is what accounts for the color variations.  I also varied the weave in making the ojo itself, which is what accounts for the visibility of the dowel in the middle of the design in parts.

At the October Nightweavers meeting, a chapter of the Weavers Guild of the North Shore, we made snowflakes for the upcoming Fine Art of Fiber taking place at the Chicago Botanic Gardens November 8-10, 2013.  The designs are surprisingly easy to put together and look quite pretty in white paper.  I am across some colored origami paper that’s white on the back, so I decided to try the design using six sheets of that, instead.

The white added a depth to the snowflake that I didn’t anticipate and like very much.  I think it would look pretty, and very different, when done on paper that has designs on both sides, especially if the designs aren’t identical.

I nipped its ear when I was punching a hole to hang it with; you can see it on the tip of the red ear here.

If you’re curious, the location where it hangs is the Pumping Station: One, a hackerspace here in Chicago.  This is the art room and the view in the background is to one of the consoles for one of our 3-D printers.

Posted in Knoontime Knitting - One Writer's Journey Into 3-D | Tagged A. Catherine Noon, acatherinenoon, Design, Journey Into 3-D, Knitting Projects, Miscellaneous Handicrafts, Ojos de Dios, Papercraft, Pumping Station: One, The Design Notebook

Needlepoint Box

Knoontime Knitting

I have written before about fabric boxes.  If you’re curious, there are four other articles here:  One, Two, Three, and Four.  I am enthralled by boxes, be they polymer clay, needlepoint, or wood.  Recently I decided to revisit the boxes of Meg Evans, which I’ve made before.  This time I decided to play with her exact design.  And therein started the problems.

Hand-Stitched Boxes:  Plastic Canvas, Cross Stitch, Embroidery, Patchwork, by Meg Evans

Ms. Evans’ book is a delight.  She has instructions for many different types of boxes, including some fun ones that fall open in a sort of puzzle-like fashion that I’m dying to make.  They’re above my skills, and then it hit me: practice!

I bought supplies to make all the easy boxes with the exception of the kleenex box covers, since I’m not  a huge fan of them.  I started with the square box since I’ve made it before.  How hard could it be, right?

This is the beginning of the design.  It uses crewel wool and pearl cotton, held double.  I had fun working out the cover and then started doing the central diamond.

Only one problem: I misread the instructions and was supposed to do a square 30 bars wide, but I cut it 30 squares wide.  By the time I caught it, it was too late to fix it without taking the entire thing apart.  

I figured, to heck with it, I’d just finish the top.  In the image below, the top is along the top row, on the right.

Then I started working the bottom piece.  This time, I added two extra lines of ivory squares to make up for the mistake in cutting the boxes too large.
I finished the design and realized that I’d forgotten to put in the center squares on two of the parts of the diamond.

I worked the walls of the bottom piece last and laid them out so you can see the design.

It sewed up fairly quickly.  Here it is with the first wall up.

As I finished the rest of the sides, I realized something.  You can see it in the image below.  There’s a little face!

I showed this to a friend of mine and she said it looks like a little cat face.  I think it looks like a little robot.

I used the dark blue to finish the top of the bottom part of the box as well as the edging along the top.  It came out quite striking, especially when you see both pieces side-by-side.

This is the completed box put together.  
I learned a lot from this project, but nothing I expected.  I don’t really have a better idea of how to put the complicated boxes together, but I learned to accept my mistakes and keep going.  The only part I took out was the one side I put on too tightly; the rest of it, I let stand because it made the box unique.
See, here’s the thing:  I do this to relax, not to make perfect boxes.  I don’t need to do make a box exactly like the instructions, I can play around with it.
Posted in Knoontime Knitting - One Writer's Journey Into 3-D | Tagged A. Catherine Noon, acatherinenoon, Fabric Boxes, Journey Into 3-D, Needlepoint

Collections as art

Knoontime Knitting

I don’t know how many times I’ve had people look at something I’ve made and confess to me that they wish they were artistic – but they just don’t have any of the necessary skills to create something.

Usually I tell them they might be too worried about making something perfect, and if they just allow themselves to try something and not worry if it comes out flawed, they’ll find they have more talent than they think they do.

And sometimes, if I know them well enough, I manage to find something they’ve created that’s artistic without them even realising it. One thing I think people tend to overlook in the quest for creativity is just the ability to assemble interesting things. A collection can be very creative and artistic without involving the elusive skills that people tend to believe they need in order to be considered ‘artsy.’

I love to decorate with my own creations, and I realized recently that the collections I have are, in fact, a form of my own creation even though I didn’t actually make the individual objects that comprise the collections.

As an example – I didn’t make the shelf or the bright colored bitters bottles that hang in my bedroom, but the collection, as a whole, makes an interesting piece of art.

Here’s the collection of miniature vases that hangs in my dining room. Most of them come from garage sales and cost no more than a dollar or two. Arranged together, they make a pretty conversation piece that a lot of visitors comment on. 
And upstairs in my office, my collection of fancy sea shells, arranged on parchment paper and framed in simple shadow boxes makes a statement on an otherwise borning wall.

Do you have any collections that you display in an artistic way? Tell me about them!

Posted in Knoontime Knitting - One Writer's Journey Into 3-D | Tagged Clarice Wynter, collections, Journey Into 3-D

Journey into my supply closet

Knoontime Knitting

They say the first step is admitting you have an problem. So, I’m here to admit that I have an addiction to crafting supplies.

I’d like to follow that up with the usual disclaimer – But I can quit any time I want. Except I can’t. The only thing limiting my purchase of crafting supplies, is the room in my supply closet – and the closet is pretty well full up at this point.

Here’s a rundown of my stuff.
Top shelf: Candle holders, miniatures, scrapbook accessories, pieced quilts [unquilted].

2nd shelf: cross stitch floss, wrapping paper, ribbons, scrapbook paper, candle making machine.

3rd shelf: Beads, crayons, clay, temari supplies, canvasses, quilt fabric.

4th shelf: glue guns, more beads, paints, brushes, palettes, styrofoam, pins, sequins and embellishments, more canvasses, candle wax, threads and needles.

Bottom (not visible): portable easel, maps, greeting cards, paper and stickers.

Yarn and crochet/knitting supplies are in another closet downstairs.

I have a feeling you fellow crafters out there are saying – wow, that’s nothing – and I hope you are, because then I won’t feel so bad about buying more stuff. I’ll just have to rearrange the closet a little bit, that’s all.

What does your craft stash look like?

Posted in Knoontime Knitting - One Writer's Journey Into 3-D | Tagged Clarice Wynter, Journey Into 3-D, organization, supplies

Solving problems with crafts

Knoontime Knitting
Last month I blogged about my adventures with Japanese temari – a lot of fun to make, but purely decorative.
While I love to make beautiful things, I find I get the most satisfaction when my crafting has practical uses. Going back to full-time office work earlier this year, I found I had two minor issues that needed a solution for my desk at work.
Problem one: I started bringing a water bottle with me to work because the water in the office cooler wasn’t always cold enough. I fill my water bottle with ice which results in it sweating all over my desk. I found I was constantly wiping up puddles and I was worried I’d accidentally ruin some important papers, so I decided I needed a bottle cover.
Problem two: Though I usually keep my cell phone on vibrate, I like to keep it handy under a shelf on my desk. When it buzzes – it’s not very quiet, so I decided I needed a cover for that also, to minimize the vibrations.
My solutions involved a size H crochet hook and one skein of Lily Sugar ‘n Cream cotton yarn. I chose ‘Beach ball’ because I love the shades of lavender.
After scoping out a couple of water bottle patterns on line, I decided just to crochet a simple round starting with 6 double crochet stitches and working around, adding stitches until the bottom of the carrier was about as wide as the bottom of the water bottle.
The yarn provides just enough give to hold the bottle snugly. I shaped the holder by crocheting in the front loop of my stitches once around, then single crocheting rows until the holder was tall enough. The shading of the yarn just happened to create a perfect spiral pattern on the holder, though I didn’t specifically set out to achieve that look.
For the cell phone holder, I just made a band of single crochet, the width of my phone and just about twice the length and sewed the sides together to make a nifty little pocket.
Now my ice water stays chilly longer than before thanks to the insulating effects of the yarn, and the bottle doesn’t sweat all over my desk, and when my cell phone buzzes, it doesn’t vibrate all over.
Quick, easy and practical. I may start making crocheted covers for everything I own.
Have you ever solved a problem with your crafting?
Posted in Knoontime Knitting - One Writer's Journey Into 3-D | Tagged Clarice Wynter, Crochet, Journey Into 3-D

Having a ball with Japanese Temari

Knoontime Knitting
I’ve been in love with the idea of making ornaments for as long as I can remember, so when I came across a book about the Japanese art of temari, I knew I had to try it.
Traditionally given as gifts, these often intricately decorated balls of thread can have designs as simple or as complex as you wish. Getting started is easy – the hard part, I found, is tearing yourself away from the thousands of designs that can be found in books and on the internet.
To start a simple temari, you’ll need a ball of leftover yarn [not a problem for all of you knitters and crocheters], a small or medium sized Styrofoam ball, an industrial sized spool of thread in any color [dark colors are best to start with IMO], an embroidery needle [or one with a large eye], pins and craft thread or embroidery floss.
Preparing a thread ball to start your design is easy. You can start with the Styrofoam ball and wrap your leftover yarn tightly around it until the ball is completely covered. [You can also skip the Styrofoam and just use yarn to start the ball, just keep the base shape as round as possible].

When you’ve completely covered the form, tuck in the end of the yarn so it doesn’t unravel and then begin wrapping thread around the yarn covered ball until you can’t see the yarn anymore. [Best to use thread in a different color from the yarn.] This part takes the longest and can use up quite a bit of thread. Turn the ball often to keep as round a shape as possible. Use the needle to tuck in the end of your thread so the ball doesn’t unravel. The thread layer allows you to ‘sew’ on the ball in any direction and gives you a place to anchor your stitches.

Next you need to divide the thread ball into sections by wrapping a thin strip of paper or a contrasting color of craft thread around the equators of the ball. You can divide the ball into any number of sections – 4 or 8 is easiest, using the needle to secure the craft thread at the poles of the ball or pinning the paper to the ball. The paper will be removed later, but the thread will become part of the design you create.
In this picture you can just about see the divisions I made with gold thread.

The simplest temari patterns involve wrapping your craft thread or floss around the ball and anchoring each pass at the guidelines you created when you divided the ball into sections.  By wrapping the ball in different directions and anchoring the thread around the guide lines, you can make stripes, triangles, stars, net-like effects, layers and even spirals.
http://www.japanesetemari.com/freepatterns/obi/obi.htm
Here’s an excellent set of instructions for basic stitches:
http://www.japanesetemari.com/TemariHow-To.html
After browsing through a few of the on-line tutorials, I was making dozens of different designs in no time. I’m always looking for books to add to my craft library, though, so I also invested in The Simple Art of Japanese Temari by Dominique Herve and Alban Negaret.
One of the things I love about temari is it utilized supplies I already had on hand – beware though, temari tend to multiply and once you master a few simple stitches you may find yourself with more temari than you know what to do with.

Posted in Knoontime Knitting - One Writer's Journey Into 3-D | Tagged Clarice Wynter, Journey Into 3-D, temari

Journey Into 3-D

Knoontime Knitting

This weekend I had an object lesson in the difference between 2-D planning and 3-D execution.  Namely, yarn estimation.

When my baby Bryce Canyon Shawl was nice and small, it was easy to imagine I’d only need a few skeins of yarn.  I’d done other triangle shawls and wanted this one to be “bigger” (technical term) so I knew if I got more yarn, I’d be fine.  So I got a few skeins.

Then I threw in the wrinkle of the two extra lace medallions.

But this also means that there are continuous increases, all the way up the shawl.

Those of you who already knit know what’s coming.  I ran out of yarn this weekend.  We went and picked up six more skeins, after running my new estimate by my husband who isn’t as geometrically challenged as me.  We shall see.

Here’s a couple progress photos for you.

The center medallion is now done, as of this weekend.  I put it on my dress form to take this picture, which turned out surprisingly well.  However, the fabric I already had on the dress form clashes horribly, which is why I’m not showing you the view from the front.

The side medallions are getting really big.  I love the way they get set off by the lace on either side; I think it’s coming out really well.  I love it when a plan comes together!
Posted in Knoontime Knitting - One Writer's Journey Into 3-D | Tagged A. Catherine Noon, acatherinenoon, Bryce Canyon Shawl, Design, Journey Into 3-D, Knitting Projects

Journey Into 3-D

Knoontime Knitting

I expected to “get” the whole 3-D thing by now. After all, I’ve been knitting, avidly, since 2000. Isn’t 12 years enough time to learn something? Apparently not. One thing I am learning is that a decrease has a slant. I learned that a while ago, really, but I’m beginning to get it in my fingers that an SSK and a K2T slant differently. I cannot for the life of me remember which is which, though. So what I did that seems to be working is to know that the SSK comes at the beginning, and the K2T at the end. I still can’t tell you which one’s left and which one’s right, but that’s okay. I’m learning. Notes: SSK = Slip, Slip, Knit. Slip the first two stitches from the left needle to the right, then insert the left needle through the front of both and knit them together. K2T = Knit 2 Together. Insert the right needle into the next two stitches on the left needle and knit as though they were one. In each case, one stitch is decreased.

Posted in Knoontime Knitting - One Writer's Journey Into 3-D | Tagged A. Catherine Noon, acatherinenoon, Journey Into 3-D
©2025 - Knoontime Knitting - Weaver Xtreme Theme
↑